Mostrando las entradas con la etiqueta cool. Mostrar todas las entradas

Understanding Bash: Elements of Programming

28 de septiembre de 2018


Ever wondered why programming in Bash is so difficult? Bash employs the same constructs as traditional programming languages; however, under the hood, the logic is rather different.

The Bourne-Again SHell (Bash) was developed by the Free Software Foundation (FSF) under the GNU Project, which gives it a somewhat special reputation within the Open Source community. Today, Bash is the default user shell on most Linux installations. Although Bash is just one of several well known UNIX shells, its wide distribution with Linux makes it an important tool to know.

The main purpose of a UNIX shell is to allow users to interact effectively with the system through the command line. A common shell action is to invoke an executable, which in turn causes the kernel to create a new running process. Shells have mechanisms to send the output of one program as input into another and facilities to interact with the filesystem. For example, a user can traverse the filesystem or direct the output of a program to a file.

Although Bash is primarily a command interpreter, it's also a programming language. Bash supports variables, functions and has control flow constructs, such as conditional statements and loops. However, all of this comes with some unusual quirks. This is because Bash attempts to fulfill two roles at the same time: to be a command interpreter and a programming language—and there is tension between the two.

All UNIX shells, including Bash, are primarily command interpreters. This trait has a deep history, stretching all the way to the very first shell and the first UNIX system. Over time, UNIX shells acquired the programming capabilities by evolution, and this has led to some unusual solutions for the programming environment. As many people come to Bash already having some background in traditional programming languages, the unusual perspective that Bash takes with programming constructs is a source of much confusion, as evidenced by many questions posted on Bash forums.

In this article, I discuss how programming constructs in Bash differ from traditional programming languages. For a true understanding of Bash, it's useful to understand how UNIX shells evolved, so I first review the relevant history, and then introduce several Bash features. The majority of this article shows how the unusual aspects of Bash programming originate from the need to blend the command interpreter function seamlessly with the capabilities of a programming language.

Bash History

The term "shell" originated from the MULTICS project, a collaboration between Massachusetts Institute of Technology (MIT), General Electric and Bell Telephone Laboratories (henceforth Bell Labs) to develop a next-generation time-sharing operating system. Unhappy with the progress, Bell Labs withdrew from the project in 1969, and the Bell Labs team who worked on MULTICS went on to develop their own operating system: UNIX.

The ancestor of Bash is the Thompson shell, the first UNIX command interpreter, developed by Ken Thompson in 1971. Figure 1 shows an excerpt from the UNIX Programming Manual, 1st edition, that describes the Thompson shell.

""

Figure 1. An Excerpt from the UNIX Programming Manual, 1st Edition, Published in 1971, Describing the Original Thompson Shell

Between 1973–1975, John R. Mashey extended the original Thompson shell and added several programming capabilities, making it a high-level programming language. In Mashey's own words:

Modifications have been aimed at improving the use of the shell...and making it even more convenient to use as a high-level programming language. In line with the philosophy of much existing UNIX software, an attempt has been made to add new features only when they are shown necessary by actual user experience in order to avoid contaminating a compact, elegant system through "creeping featurism". (From J. Mashey, "Using a Command Language as a High-level Programming Language", CSE '76 Proceedings of the 2nd International Conference on Software engineering, 1976.)

Stephen Bourne started working on a new shell early in 1976. The Bourne shell benefited from the concepts introduced by the Mashey shell, and it brought some new ideas of its own. The Bourne shell officially was introduced in UNIX Version 7, released in 1979.

The original Thompson shell, the Mashey shell and the Bourne shell were all called sh, and they overlapped or replaced one another in the years 1970–1976 as they were refined and gained additional capabilities. Throughout 1970s, UNIX was mostly being developed at Bell Labs and, in parallel, at the University of California at Berkeley (the variant known as BSD). With the development of UNIX, shells were constantly developed and refined. At the time when the Bourne shell already was in use, Bill Joy at Berkeley developed the C shell (csh). The C shell was the first truly alternative UNIX shell, and it was incorporated in the 2BSD release of Berkeley UNIX. In the early 1980s, David Korn developed the Korn shell (ksh). Compared to the Bourne shell, the C shell emphasized the command interpreter mode, and the Korn shell came with more extensive programming capabilities.

UNIX development efforts at Bell Labs and Berkeley enriched each other, and the two versions were later merged. In the 1980s, AT&T licensed UNIX to a number of commercial vendors, and this resulted in the disruptive wars for the UNIX market domination. In 1985, Richard Stallman established the Free Software Foundation (FSF), whose main initiative was to build a free-to-use UNIX-like system, one that is not encumbered by the intellectual property issues surrounding UNIX. This is the famous GNU Project ("GNU's not UNIX"). In fact, the original letter from Stallman, sent on the net.unix-wizards mailing list in September 1983, started with the cry: "Free Unix!"

Since it's impossible to have free UNIX without a shell, that was a priority for the GNU Project. Brian Fox, the Free Software Foundation's first paid programmer, started working on a shell 1988. This became Bash, first released as beta in 1989. Bash is mostly a clone of the Bourne shell (hence "Bourne-Again"), but it also includes additional features inspired by the C shell and Korn shell. Brian Fox was the official maintainer of Bash until 1992. At the time, Chet Ramey already was involved with the work on Bash, and he became the official maintainer in 1993. Chet Ramey continued to maintain and develop Bash for the next 25 years, and he's still Bash's current maintainer.

Doing Two Different Things at Once

The original Thompson shell was a simple command interpreter whose mode of operation was as follows:


$ command [ arg1 ... [ argN ]

where command is the name of the executable file (that is, a command to be executed), and the optional arguments arg1 ... argN are passed to the command. The Thompson shell had no programming capabilities. This changed with the development of the Mashey shell (and later the Bourne shell). In his seminal paper "The UNIX Shell", published in 1978, Stephen Bourne wrote:

The UNIX shell is both a programming language and a command language. As a programming language, it contains control-flow primitives and string-valued variables. As a command language, it provides a user interface to the process-related facilities of the UNIX operating system. (S.R Bourne, "The UNIX Shell", The Bell System Technical Journal, Vol 56, No 6, July–August 1978.)

Note the emphasis on the different functionality: a programming language and a command language. In fact, it was the Mashey and Bourne shells that extended the capabilities of the Thompson shell beyond the command interpreter. The shell's original role was a command interpreter, and the programming capabilities of shells were added later. UNIX shells evolved some ingenious ways of consolidating the programming capabilities with the original command interpreter role.

Bash Mode of Operation

Today's Bash is more powerful compared to the original Mashey shell and the Bourne shell. However, the purpose of the shell remains exactly the same. Arguably, the most important function of the shell is running commands (that is, submitting an executable file to the kernel for execution). This has several profound ramifications. For a start, Bash treats (almost) anything that is given to it as a command. Consider the following Bash session:


$ VAR
bash: VAR: command not found
$ 9
bash: 9: command not found
$ 9 + 1
bash: 9: command not found
$

This shows that Bash splits the input into words, then attempts to execute the first word as a command (the "words" VAR and 9). Here, a "command" may be either a Bash built-in command (such as cd), a utility (such as /bin/ls) or some other executable file. When the string 9 + 1 was given on input, Bash split it into three "words": 9, + and 1. It's important to note that Bash keeps all words as strings and has no concept of numbers until forced to do an arithmetic evaluation. As a rather simplified summary, Bash operates as follows:

  1. Takes the input and splits it into words on white spaces (space or tab).
  2. Assumes that the first word is a command. If anything follows the first word, it assumes they are arguments to be passed to the command.
  3. Attempts to execute the command (and pass the arguments to it, if any).

This view ignores several intermediate steps. For example, Bash scans the input line and performs all sorts of expansions and replacements. It also checks for a built-in command with the name given, and executes that, if it exists. Not to lose sight of the big picture, I often ignore these details.

So, Bash's most essential purpose is to execute commands, and this has some profound implications. Notably, the programming constructs in Bash, which at first sight may look like a programming language, are derived from this mode of operation. And, that is the central theme of this article.

Bash Built-ins vs. External Commands

The point that's often confusing to Bash newcomers is the difference between Bash built-in commands and external commands. On a typical Linux/UNIX system, a number of common commands are both built-in in Bash and also exist as independent executables with the same name. Examples of this include echo (built-in) and /bin/echo, kill (built-in) and /bin/kill, test (built-in) and /usr/bin/test (and there are more). Consider how the Bash built-in echo and /bin/echo behave very similarly:


$ echo 'Echoed with a built-in!'
Echoed with a built-in!
$ /bin/echo 'Echoed with external program!'
Echoed with external program!
$

However, there are also subtle differences (try echo --version). Why this duplication of commands? There are several reasons. The built-in version typically exists for performance reasons: Bash built-ins execute within the shell process that's already running. In contrast, executing an external utility involves loading and executing the external binary by the kernel, which is a much slower process.

At this point, it's useful to note that some shell commands, by their nature, cannot be external utilities (in other words, they must be shell built-ins). Consider the cd command that changes the current working directory. An external utility wouldn't be able to change the shell's current working directory, so cd must be a Bash built-in. Why? Because invoking a command as an external utility would make the shell its parent process, and a child process cannot change the current working directory of the parent process.

You could turn this question around and ask, "if echo is already built in to the shell, why does the external utility /bin/echo exist?" That's because one doesn't always work through the shell and may need to invoke echo without the mediating shell process. Second, in principle, there's nothing to enforce that a UNIX shell must have echo as a built-in, and therefore, it's important to have the external utility /bin/echo as a fallback.

A practical problem users often face is this: how do you know whether the command you just called is the shell built-in or an external utility with the same name? The Bash command type (which is itself a shell built-in) indicates what command would be used if executed. For example:


$ type echo
echo is a shell builtin
$ type ls
ls is hashed (/bin/ls)
$

The basic rule is as follows: if the built-in command with a given name exists, it will be executed. If the built-in command doesn't exist, Bash will search for an external program, and if found, will execute it. If you want to be sure to use the executable, which happens to have the same name as a shell built-in, calling the executable with the full path will do.

Variable Assignment

When a command is entered in Bash, Bash expects that the first word it encounters is a command. However, there's one exception: if the first word contains =, Bash will attempt to execute a variable assignment. For example:


$ VAR=7
$

This has assigned the value 7 to the variable named VAR. To retrieve the value of a variable, you need to prefix the variable name with the dollar sign. Thus, to view the value of a variable, you can combine the dollar-sign prefix with echo:


$ echo $VAR
7
$

For a variable assignment, a contiguous string that contains = is important. The following will fail:


$ VAR = 1
bash: VAR: command not found
$

In this case, Bash splits the input VAR = 1 into three "words" (VAR, = and 1) and then attempts to execute the first word as a command. This clearly isn't what was intended here.

The ? Built-in Variable

Although Bash allows you to create arbitrary variables on the fly simply by assigning the values to them, it also has a number of built-in variables. An example of a built-in variable is BASHPID. This contains the process ID of the Bash shell itself:


$ echo $BASHPID
2141
$

Another built-in variable (and one that I cover extensively here) is ?. At any point in a Bash session, this variable contains the return value of the last executed command. The return value is always an integer. (And specifically, this is the return value of the C program function main(). Note: in any C program the function main() must return an integer.) By the UNIX convention, the return value of 0 denotes success, and any other value denotes failure. For example, consider the utility /bin/ls:


$ touch NEWFILE
$ /bin/ls NEWFILE
NEWFILE
$ echo $?
0
$

As per the convention, the utility /bin/ls returned 0 on success, which you can see by inspecting the value of ?. If ls is unable to execute (for example, unable to access the file), it returns the value >0:


$ /bin/ls DOESNOTEXIST
ls: cannot access 'DOESNOTEXIST': No such file or directory
$ echo $?
2
$ echo $?
0
$

In the last example, note that the first ? was set to 2, and the second ? was set to 0. Why? Because the second ? contains the exit status of the echo command (which executed successfully). Remember, the ? variable contains the exit status of the last executed command. You can use the commands true and false to set the value of ? to 0 or 1, respectively:


$ false
$ echo $?
1
$ false
$ true
$ echo $?
0
$

That might look rather silly at first, but keep reading.

Bash Blending Behavior

Now let's consider how Bash provides an impression of a seamlessly integrated command environment, even when the tasks it executes are inherently quite different. First, note that running a Bash built-in command produces the same effect on the ? variable as running an external program:


$ false   #  set ? to 1
$ echo 'Calling a built-in command'
Calling a built-in command
$ echo $?
0

This example shows that calling the built-in command echo changed ? to 0 (to confirm this, first run the false command, which sets ? to 1). The point is that it behaves the same as calling the external program echo:


$ false  #  set ? to 1
$ /bin/echo 'Calling external program'
Calling external program
$ echo $?
0

Yet, these two scenarios are quite different. In the first scenario, Bash invoked an internal command echo; in the second example, Bash requested from the kernel to run an external executable (/bin/echo) and suspended itself waiting for the executable to complete. The effect on the ? variable is exactly the same.

Even for a variable assignment, Bash will set the ? variable accordingly:


$ false   #  set ? to 1
$ VAR=one
$ echo $?
0
$

From this, you can see that Bash treats a variable assignment as a command. If the variable assignment is not successful, ? is set to a value >0. For example, the built-in variable BASHPID is read-only, and you can't change it (that is, Bash can't change its own process ID). So this will fail:


$ true  #  set ? to 0
$ BASHPID=99
$ echo $?
1
$

Attempting to execute a non-existent command would also set ? to indicate a failure:


$ true  # set ? to 0
$ DUMMY
bash: DUMMY: command not found
$ echo $?
127
$

In this case, Bash filled the special variable ? with the number 127. This number is hard-wired in Bash, and it specifically means "command not found".

To summarize, the above examples show three completely different scenarios: invoking an internal Bash command, running an external program and variable assignment. Yet, Bash views all three as command execution and provides a common behavior with respect to the ? special variable. Armed with these insights, now let's examine three basic programming constructs in Bash: the if statement, the while loop and the until loop.

The Conditional if Statement

The fundamental element of almost every programming language is the conditional if statement. In the C language, it looks like this:


if (TRUTH_TEST) {
   statements to execute
}

Here TRUTH_TEST is a test that evaluates true or false according to the rules of the C language. This is sometimes called "truth value testing". Here's an example of this in Python:


if True:
    print('Yay true!')

In Bash, the same example looks like this:


if true
then
  echo 'Yay true!'
fi

You can reformat this by using ; to provide a handy one-liner to type in:


$ if true; then echo 'Yay true!'; fi
Yay true!
$

This looks very much like the if conditional statement in any programming language. However, it's not. In the above example, true is a command. In fact, true is a shell built-in:


$ type true
true is a shell builtin
$ help true
true: true
    Return a successful result.

    Exit Status:
    Always succeeds.

Let that sink in: true is a command. In fact, that's the same true command that was run above from the command line to set the value of the ? variable. What then is the if statement evaluating? It's evaluating the return value of the true command. If you're not convinced, consider that true can be replaced with the external utility /bin/true:


$ if /bin/true; then echo 'Yay true!'; fi
Yay true!
$

Where:


$ man true
TRUE(1)                User Commands                   TRUE(1)

NAME
       true - do nothing, successfully

SYNOPSIS
       true [ignored command line arguments]
       true OPTION

DESCRIPTION
       Exit with a status code indicating success.

If true is a command, you can put any command there, right? Indeed:


$ if /bin/echo; then echo 'Yay true!'; fi

Yay true!
$

Notice how the blank line was printed before the string Yay true!. That's because the if statement actually executed the command /bin/echo, and without any arguments, this prints a newline character. You actually can give an argument to the echo command:


$ if /bin/echo 'Hi'; then echo 'Yay true!'; fi
Hi
Yay true!
$

The two echo commands executed here are different: the first is the external utility /bin/echo; the second, an echo that appears in the body of the if statement, is the shell built-in. Clearly, the second echo could be replaced with the external utility too.

Moving on, I mentioned previously that Bash will treat the variable assignment as a command. Thus, variable assignment can be used in the same place as the built-in command or external executable:


$ if VAR=99; then echo 'Assignment done!'; fi
Assignment done!
$ echo $VAR
99
$

To sum up, the general form of the if conditional statement is: if CMD1; then CMD2; fi where CDM1 and CMD2 are commands. The if statement controls flow by evaluating the exit code of the command CMD1: if CMD1 was successful (judging by the exit status of 0), then CMD2 is executed. This is rather different compared to truth value testing in most traditional programming languages, and it's the source of much confusion. I shall call this the source of confusion number 1.

The false Command

I just described how true is a command. So not surprisingly, there is a false, the exact opposite of true. For the Bash built-in:


$ type false
false is a shell builtin
$ help false
false: false
    Return an unsuccessful result.

    Exit Status:
    Always fails.
$

And, there is an external utility with the same function:


$ man false
FALSE(1)               User Commands                 FALSE(1)

NAME
       false - do nothing, unsuccessfully

SYNOPSIS
       false [ignored command line arguments]
       false OPTION

DESCRIPTION
       Exit with a status code indicating failure.

The commands true and false do nothing, but exit with the status 0 or 1, respectively. Since the if statement evaluates the exit code when deciding whether to execute the body, if true always succeeds, and if false always fails. Note that the exit value of true is 0, and the exit value of false is 1. This is somewhat counterintuitive, and it's the exact opposite of most programming languages. For example, in Python truth value testing, 0 is equated with False (boolean), and 1 is equated with True (boolean).

Bash if Is Testing the Exit Value

Let's confirm that the if statement in Bash is merely testing the value of the program's exit value by writing a simple C program, true.c, that returns 1 (note, the real utility true returns 0, or success!):


int main() {
   return 1;
}

This program doesn't do much; it merely returns 1 as the exit status. According to the UNIX convention, the exit status of 1 indicates a failure (no matter that the program may run just fine!). Let's compile and execute this program, and confirm that it returns an "unsuccessful" exit status to the shell:


$ gcc true.c -o true
$ ./true
$ echo $?
1
$

So, if you use this program in the if statement, the output won't be what you may expect:


$ if ./true; then echo 'Yay true!'; fi
$

In other words, the true command has "failed". This example confirms that all the if statement does is evaluate the exit status. It doesn't matter that the program runs just fine, exactly as intended; from the Bash perspective, a non-zero exit status indicates failure. This I shall call the source of confusion number 2.

More Bash Ingenuity

Consider the following task: test if the file exists, and if it does, delete it. For this you can use the Bash built-in test command with the -e flag:


$ rm dum.txt        # make sure file 'dum.txt' doesn't exist
$ test -e dum.txt   # test if file 'dum.txt' exists
$ echo $?           # confirm that the command test failed
1
$ touch dum.txt     # now create file 'dum.txt'
$ test -e dum.txt   # test if file 'dum.txt' exists
$ echo $?           # confirm the command test was successful
0
$

Therefore, to test if the file exists, and if yes, delete it:


$ touch dum.txt    # create file 'dum.txt'
$ if test -e dum.txt; then rm dum.txt; fi  # file deleted
$

The key to note here is that if test -e dum.txt; then rm dum.txt; fi actually executes the command test -e dum.txt. In this case, test is a Bash built-in. As you might suspect, there is a /usr/bin/test utility that does the same thing and could be used to the same effect:


$ touch dum.txt  # create file 'dum.txt'
$ if /usr/bin/test -e dum.txt; then rm dum.txt; fi
 ↪# file deleted
$

Now, Bash implements [ ] as a synonym for the built-in test command:


$ test -e dum.txt  #  command successful if file exists
$ [ -e dum.txt ]   #  exactly the same as previous example!

Note, [ -e dum.txt ] is a command. And this, of course, returns 0 on success and 1 on failure. Let's confirm:


$ rm dum.txt
$ [ -e dum.txt ]
$ echo $?
1
$ touch dum.txt
$ [ -e dum.txt ]
$ echo $?
0
$

With this understanding, you can repeat the above example with the [ -e ... ] construct:


$ touch dum.txt  # create file 'dum.txt'
$ if [ -e dum.txt ]; then rm dum.txt; fi  # file deleted
$

The last construct looks even more like the if control statement in most traditional programming languages. However, it's not. [ ] is a command—basically another way to call the built-in test command.

Command Lists

The surprises don't quite end there. In Bash, the if statement can take any number of commands separated by a semicolon, after the keyword if and before the body denoted with the keyword then. Something like this: if CMD1; CMD2; ... CMDN; then CMDN+1; CMDN+2; CMDN+M; fi. The if statement evaluates all commands sequentially and executes the body of the loop only if the exit status of the last command is 0 (a success by convention). Consider the following example:


$ if false; true; then echo 'Yay true!'; fi
 ↪# body will execute
Yay true!
$ if true; false; then echo 'Yay true!'; fi
 ↪# body will not execute
$

So in Bash, it's completely legal to write something like this:


$ if [ -e dum.txt ]; echo 'Hi'; false; then rm dum.txt; fi
Hi
$

This executes three commands given after if, and it never will execute the body (rm dum.txt) because the last command is false, which always fails (more precisely, returns a non-zero status). In summary, in place of a single command, you can use a list of commands. The overall exit status of such a command list is given by the exit status of the last command in the list. This I shall call the source of confusion number 3.

The Loops while and until

Understanding the behavior of the if statement is rather useful because the same behavior applies to while and until loops. Consider the following example:


$ while true; do echo 'Hi, while looping ...'; done
Hi, while looping ...
^C
$

Let's understand exactly what happened here. First, the while loop executed the true command and evaluated its exit status. Since the exit status of true is always 0, it executed the body of the loop (echo 'Hi, while looping ...'). Then it went back for another cycle of the same. Because the true command always runs with success, this created an infinite loop (which was broken with Ctrl-C). Since true is a command, you can replace it with any command. For example:


$ while /bin/echo 'ECHO'; do echo 'Hi, while looping ...'; done
ECHO
Hi, while looping ...
ECHO
Hi, while looping ...
ECHO
Hi, while looping ...
^C
$

Thus, this while loop merely alternates the execution of the two echo commands: /bin/echo, the external executable, and echo, the Bash built-in.

As you might suspect, the while construct can accept a command list, and in such a case, it would proceed to execute the body of the loop based on the exit status of the last command in the list. In other words, the general form of the while loop is as follows: while CMD1; CMD2; ... CMDN; do CMDN+1; CMDN+2; CMDN+M; done. For example:


$ while true; false; do echo 'Hi, looping ...'; done
$

In this example, the body of the loop is not executed because the last command is false (which always fails). The until loop works similarly:


$ until false; do echo 'Hi, until looping ...'; done
Hi, until looping ...
^C
$

In the case of the until loop, the body of the loop executes as long as the command listed after the keyword until is returning a non-zero exit status. Since the command false returns a non-zero exit status every time, the above example resulted in an infinite loop. And of course, in the general form, the until loop can accept command lists: until CMD1; CMD2; ... CMDN; do CMDN+1; CMDN+2; CMDN+M; done.

You may ask, if these loops merely execute two commands (or two command lists), how is it useful in practice at all? The commands that are tested in the loop may depend on some dynamic condition (for example, the number of bytes written to a file, or the type of network traffic and so on). The change in conditions may cause the command to fail or succeed. Also you can modify the Bash variable in the body of the loop, which leads to the use of loops similarly as shown here:


$ i=1
$ while [ $i -le 3 ]; do echo $i; i=$((i+1)); done
1
2
3
$

Here ((i + 1)) forces Bash arithmetic evaluation, and $((i + 1)) returns the resulting value; the construct [ $i -le 3 ] is a synonym for test $i -le 3 that performs arithmetic comparison. Note that from the perspective of Bash, this is a command that executes successfully or not:


$ i=1
$ [ $i -le 3 ]
$ echo $?
0
$ i=9
$ [ $i -le 3 ]
$ echo $?
1
$

This is why the [ $i -le 3 ] construct can be used after the while keyword, which expects a command (or a command list).

Conclusion

Bash is an independently implemented derivative of the Bourne shell produced by the GNU Project, with enhancements inspired by the C shell and the Korn shell. The original UNIX shell (the Thompson shell) was a simple command interpreter. Subsequently, the Mashey shell and the Bourne shell blended in programming capabilities. Since Bash is a direct descendant of the Bourne shell, it inherited all the key ideas of how a programming environment works. This includes how it blends the programming language with the command interpreter. And for that purpose, UNIX shells have evolved some ingenious solutions.

In Bash, the programming constructs look similar to those found in traditional programming languages. However, how those programming constructs inherently work is quite different. This can be rather confusing to people coming with some knowledge of the traditional programming languages (which is usually the case for Bash users). Here are the three main sources of confusion with Bash programming:

  1. The surprising aspect of Bash programming is that the constructs if, while and until evaluate the exit status of a command. Basically these constructs evaluate the following: "is the exit status zero?" By the UNIX convention, the exit status of 0 denotes success, and anything else denotes a failure.
  2. The exit status is an integer returned by the executable—think of this as the value returned by the C function main(). Note that a program that runs just fine may return a non-zero exit status (I showed an example of this above). However, writing such programs is not recommended. It would break the convention, and it most likely will break other things since the entire environment relies heavily on this convention.
  3. A single command can be replaced by a list of commands separated by a semicolon. In such a case, the exit status of a command list is the status returned by the last executed command.

Acknowledgements

My sincere thanks to Chet Ramey for his feedback on the draft of this article. I would also like to thank Isidora C. Likic for checking the text and examples.

Resources

Too many articles and books on this topic exist to list in this space, but if you're interested in learning more, we recommend these Linux Journal articles (and there are actually too many LJ articles to list here as well, but here are some to get you started):

Bash Videos:

For more programming articles like this, check out the Programming Deep Dive section of the October 2018 issue of Linux Journal.


Thanks to: Linux Journal - The Original Magazine of the Linux Community Permanent link

Cómo conectar un móvil Android al ordenador con ADB

27 de septiembre de 2018


Cómo conectar un móvil Android al ordenador con ADB

ADB son las siglas de Android Debug Bridge, un sistema para comunicarte y controlar un dispositivo Android mediante línea de comandos. Aunque está pensado más que nada para desarrolladores, es tan versátil que resulta útil también para el usuario final.

Con frecuencia hemos visto que ADB sirve como alternativa a root para otorgar permisos especiales a aplicaciones, para instalar actualizaciones del sistema manualmente o incluso grabar la pantalla en vídeo sin instalar nada. Lo mejor de todo es que hoy en día usar ADB está al alcance de cualquiera.

Por simplificar, vamos a basar nuestras indicaciones en ADB para Windows, aunque como sistema multiplataforma, ADB está disponible también para Mac y Linux, siendo las indicaciones en todo caso prácticamente idénticas, con las peculiaridades de cada sistema.

1. Hazte con ADB

Lo primero de todo, necesitas el ejecutable de ADB. Antiguamente lo más normal era bajarse el SDK de Android, que lo incluye, pero hoy en día no es ni necesario ni recomendable, a no ser que tengas pensado desarrollar aplicaciones para Android. En su lugar puedes descargarte solo los ejecutables, que ocupan mucho menos: 6 MB en lugar de más de 100 MB de todas las herramientas de línea de comandos o casi 1 GB de Android Studio.

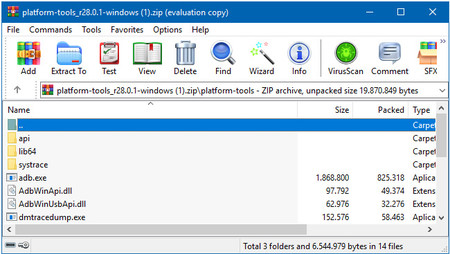
La descarga es un archivo ZIP que contiene ADB.exe (el archivo que nos interesa) y unos cuantos más. Descomprime todo su contenido en una carpeta de tu disco duro fácilmente accesible. Por ejemplo, C:\ADB es una buena opción.

Zip
Zip

Hoy en día no suelen ser necesarios, pero podrías necesitar controladores USB de ADB. Estos controladores se instalan automáticamente con la aplicación oficial, pero generalmente controladores USB universales como estos de Koush deberían funcionar.

2. Activa la depuración USB

La D de ADB viene de Debug o depuración, y efectivamente necesita que tu móvil tenga activada la depuración USB para funcionar. Y para activar la depuración USB primero necesitas activar las opciones para desarrolladores. Suena complicado, pero en realidad es un minuto.

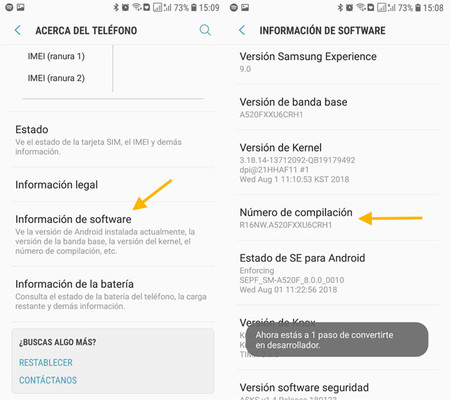
En tu móvil, ve a Ajustes y Acerca del teléfono. A partir de aquí la ruta varía mucho de una capa de Android y versión a otra, pero tu objetivo es llegar al lugar donde se muestra el Número de compilación o Build number. Es posible que se encuentre dentro de algún submenú (en últimas versiones de Samsung está en información de software).

Opcionesdedes
Opcionesdedes
Debes tocar en "número de compilación" unas ocho veces

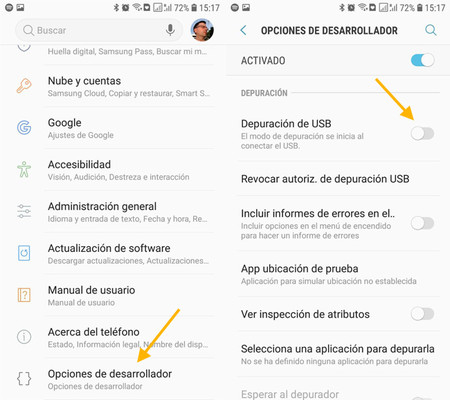
Ya con las opciones para desarrollador activas, vuelve a los ajustes de Android y verás que hay un nuevo elemento en la lista. Efectivamente, son las opciones de desarrollador. Entra en ellas y busca en la lista la Depuración de USB, que deberás activar.

Depura
Depura

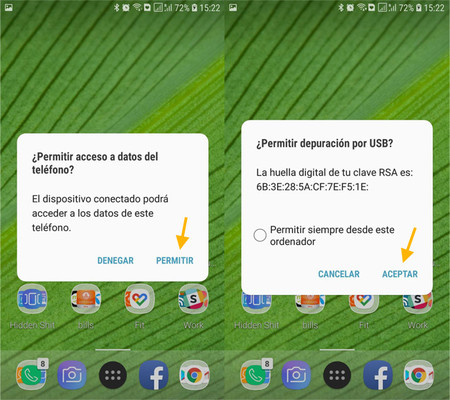
Una ventana emergente te pedirá confirmación y después ya tienes el móvil listo... por ahora. Deberás volver a él en el siguiente paso para aceptar la conexión desde el ordenador que estás usando para conectarte.

3. Conecta el móvil al PC con su cable

Conecta el móvil al PC mediante su cable USB y espera a que terminen de configurarse los controladores. Desbloquea al teléfono y deberías ver un aviso pidiéndote si permites la conexión desde el móvil.

Ten en cuenta que puedes recibir dos tipos de avisos: la conexión de datos del teléfono es solo para acceder a los datos (fotos, etc) y es opcional para nuestro caso. La que debes permitir es la depuración USB. Opcionalmente, si vas a hacer esto con frecuencia, puedes marcar Permitir siempre para que no te vuelva a preguntar.

Depusbb
Depusbb

Con esto ya tienes el móvil listo, esta vez de verdad de la buena. Ya casi hemos terminado, y el resto del proceso será desde la línea de comandos del PC.

4. Inicia ADB

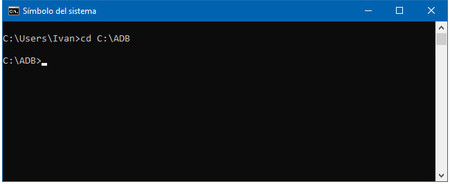
Volvemos de vuelta al PC. Abre una línea de comandos en la carpeta en la que descomprimiste el ZIP de ADB. En Windows debes usar Inicio > Ejecutar y escribir CMD. Para ir a la carpeta, si es C:\ADB, escribe cd C:\ADB en la línea de comandos.

Cdadb
Cdadb

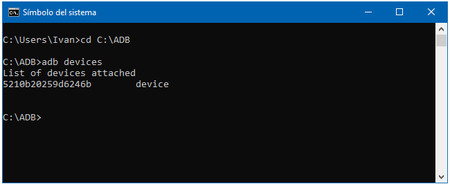
Cuando ya estés en la carpeta, escribe ADB devices. Si todo ha ido bien, te aparecerá un único dispositivo y al lado la palabra device. Ten en cuenta que el nombre del dispositivo es un código que no significa nada.

Adbdevices
Adbdevices

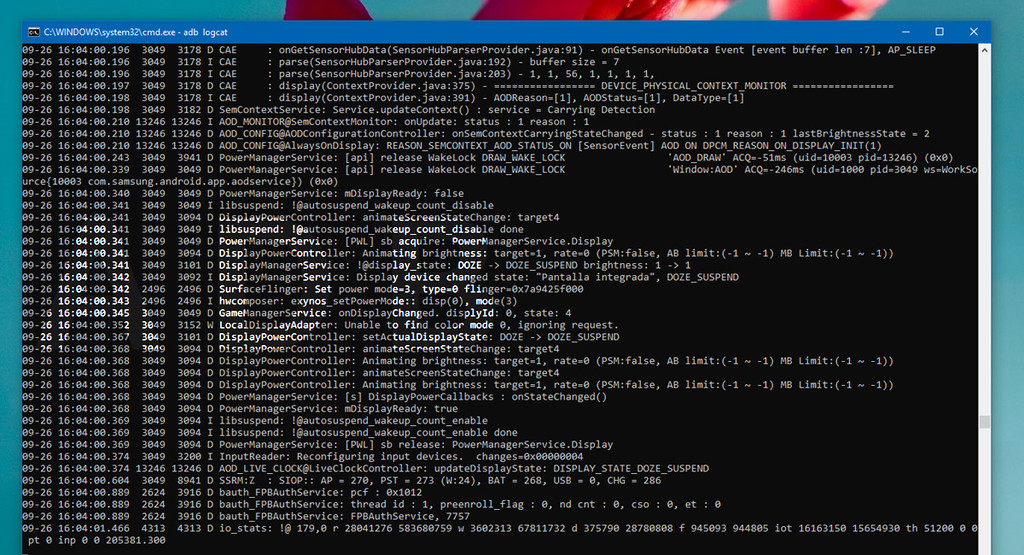
Enhorabuena, ya tienes tu móvil listo y conectado por ADB a tu PC. Si quieres hacer una prueba sencilla escribiendo adb shell screencap -p /sdcard/captura.png. Esto hará una captura de pantalla y la guardará en tu móvil. La puedes consultar en la galería de tu móvil. Otra opción es escribir adb logcat y ver así todos los mensajes escritos en el Logcat (algo así como el registro) de Android.

-
La noticia Cómo conectar un móvil Android al ordenador con ADB fue publicada originalmente en Xataka Android por Iván Ramírez .


Thanks to: Xataka Android Permanent link

Prototyping Tools All Designers Must Try

Google cumple 20 años, y así lucía el garaje donde se creó

How to Launch a New Website – Tips, Tricks and Insights

15 de agosto de 2018

Esta web te permite reproducir sonidos de 14.000 aves perfectamente ordenados mediante Machine Learning


Web Pajaros

Dos desarrolladores y una ornitóloga han creado un curioso experimento web llamado Bird Sounds, y que te permite reproducir el sonido de más de 14.000 especies diferentes de ave. Y no sólo eso, sino que la página hace uso del Machine Learning para catalogar y organizar automáticamente todos estos sonidos partiendo de la base de datos del Laboratorio de Ornitología de Cornell.

Para organizar los sonidos, los desarrolladores primero recortan cada uno a pequeños clips de apenas un segundo, y luego utilizan la técnica t-SNE para que la su algoritmo de Inteligencia Artificial sea capaz de crear una huella digital única para cada uno de los sonidos. La huella contiene toda la información del audio, y permite que el algoritmo entienda cómo suena aunque se haya reducido todo a puro código.

14000 sonidos

Y es precisamente a partir de esa huella que el algoritmo después organiza todos los sonidos, agrupando todos los que se parecen y pertenecen a aves similares. El resultado es el que ves, un mapa interactivo de sonido por el que puedes navegar haciendo click en cada sonido que se visualiza para hacerlo sonar.

La página incluye un buscador para poder encontrar una especie concreta, y cuando pulsas sobre cada uno de los sonidos se te muestra el nombre y una fotografía del animalen concreto. Por último, la web también te permite mantener el click izquierdo del ratón pulsado y deslizarlo por ella para ir reproduciendo todos los sonidos por los que pasas, de manera que puedes pasarte la tarde componiendo melodías con miles de pájaros.

Esperan que esto sólo sea un primer paso

Tal y como explican en este vídeo de presentación, la idea del experimento surgió cuando los desarrolladores hablaron con miembros de la Universidad de Cornell sobre lo interesante que sería aplicar el Machine Learning a los sonidos de los pájaros, y ha sido desarrollado en colaboración con el Google Creative Lab.

Los creadores de esta IA capaz de catalogar y organizar sonidos también hablan de su sueño de que este tipo de algoritmos pueda llegar a utilizarse para identificar y monitorizar diferentes tipos de especies animales en el futuro utilizando técnicas de reconocimiento de sonidos. Sin embargo, para eso todavía queda un largo camino.

En cualquier caso, cualquier persona que quiera jugar, estudiar o reutilizar el experimento de este grupo puede hacerlo accediendo al código en su página de Github, ya que han decidido que sea de código abierto para que cualquiera pueda aprovechar su trabajo.

En Genbeta | Machine Learning con percepción humana: la idea de esta startup para que el coche autónomo entienda a los peatones

También te recomendamos

Así de naturales son las llamadas que Google Assistant hará por ti para reservar en un restaurante o pedir cita en la peluquería

A qué llamamos rodar (y ver) la realidad

China está introduciendo la inteligencia artificial como asignatura en los institutos

-
La noticia Esta web te permite reproducir sonidos de 14.000 aves perfectamente ordenados mediante Machine Learning fue publicada originalmente en Genbeta por Yúbal FM .


Thanks to: Genbeta Permanent link

Si buscas un editor de vídeo gratuito y profesional, descarga el nuevo DaVinci Resolve 15 para Windows, Linux o macOS


davinci resolve 15

Aunque existen muchas opciones para editar vídeo gratis y hasta online que podemos usar desde múltiples plataformas, pocas son tan completas y poderosas como DaVinci Resolve, y con su más reciente lanzamiento han añadido cientos de mejoras y herramientas adicionales.

DaVinci Resolve 15 ofrece herramientas de edición, efectos visuales, gráficos en movimiento, corrección de color y post producción de audio, y puedes descargarlo de forma gratuita para Windows, macOS o Linux.

Si bien la versión gratuita del programa incluye todas las prestaciones para editar y etalonar, y te deja realizar proyectos con una frecuencia de imagen máxima de 60 fotogramas por segundo, debes tener en cuenta que la versión gratuita no soporta h26x, así que tendrás que transcodificar los vídeos de ese tipo antes de poder usarlos.

Davinci Resolve

La versión de pago, DaVinci Resolve Studio, cuesta 259 euros y ofrece colaboración entre múltiples usuarios, herramientas 3D y brinda compatibilidad con formatos 4K y otros de mayor resolución, así como con frecuencias de imagen de hasta 120 fotogramas por segundo, e incluye otras funciones y filtros exclusivos, tales como destellos o efectos de granulosidad.

DaVinci Resolve admite los principales formatos y la posibilidad de procesar archivos XML, EDL o AAF para importar y exportar entre él y otros programas de edición como Final Cut Pro X, Media Composer y Premiere Pro. Y, su integración con Fusion te permite enviar tomas con efectos visuales a programas como After Effects, o a ProTools, para el procesamiento del audio.

Otra buena noticia para los usuarios de Linux en particular, es que DaVinci Resolve 15  finalmente incluye sporte de audio nativo para la plataforma. Especialmente útil teniendo en cuenta que no sobran las opciones como en Windows y Mac.

Descargar | DaVinci Resolve 15
En Genbeta | El editor de vídeo Kdenlive llega a Windows en sus nuevas versiones

También te recomendamos

14 editores de video gratis en Windows y online

A qué llamamos rodar (y ver) la realidad

Ya puedes descargar VLC 3.0 con soporte para Chromecast, vídeo HDR, HTTP 2.0 y muchas mejoras más

-
La noticia Si buscas un editor de vídeo gratuito y profesional, descarga el nuevo DaVinci Resolve 15 para Windows, Linux o macOS fue publicada originalmente en Genbeta por Gabriela González .


Thanks to: Genbeta Permanent link

Awk: Aprendiendo Shell Scripting usando el comando de terminal awk

Git Quick Start Guide


Ditch USBs and start using real version control, and if you follow this guide, you can start using git in 30 minutes!

If you have any experience with programming or just altering config files, I'm sure you've been dumbstruck by how one change you've made along the line affects the whole project. Identifying and isolating the problem without a version control system is often time- and energy-intensive, involving retracing your steps and checking all changes made before the unwanted behavior first occurred. A version control system is designed explicitly to make that process easier and provide readable comparisons between versions of text.

Another great feature that distributed version control systems such as git provide is the power of lateral movement. Traditionally, a team of programmers would implement features linearly. This meant pulling the code from the trusted source (server) and developing a section before pushing the altered version back upstream to the server. With distributed systems, every computer maintains a full repository, which means each programmer has a full history of additions, deletions and contributors as well as the ability to roll back to a previous version or break away from the trusted repository and fork the development tree (which I discuss later).

Quick Start Guide

The great thing about git is there's so little you need to know! Without further ado, let's begin with the most important commands.

First, I'm working with a previous project of mine located here:


[user@lj src]$ pwd
/home/lj/projects/java/spaceInvaders/src

To create a local repository, simply run:


[user@lj src]$ git init
Initialized empty Git repository in
 ↪/home/lj/projects/java/spaceInvaders/src/.git/

To add all source files recursively to git's index, run:


[user@lj src]$ git add .

To push these indexed files to the local repository, run:


[user@lj src]$ git commit

You'll see a screen containing information about the commit, which allows you to leave a description of the commit:


# Please enter the commit message for your changes. Lines starting
# with '#' will be ignored, and an empty message aborts the commit.
# On branch master
#
 Initial commit

 Changes to be committed:
        new file:   engine/collisionChecker.java
        new file:   engine/direction.java
        new file:   engine/gameEngine.java
        new file:   engine/gameObjects.java
        new file:   engine/level.java
        new file:   engine/main.java
        new file:   engine/mathVector.java
        new file:   graphics/drawer.java
        new file:   sprites/baseSprite.java
        new file:   sprites/boss.java
        new file:   sprites/enemy.java
        new file:   sprites/healthBar.java
        new file:   sprites/menu/menuItem.java
        new file:   sprites/menu/menuItemExclusiveMoveOnInput.java
        new file:   sprites/menu/menuItemLevelDecrease.java
        new file:   sprites/menu/menuItemLevelIncrease.java
        new file:   sprites/menu/menuItemMovementDirections.java
        new file:   sprites/menu/menuItemProjectileLimit.java
        new file:   sprites/menu/menuItemStartGame.java
        new file:   sprites/pickup/fireRateBoost.java
        new file:   sprites/pickup/pickup.java
        new file:   sprites/pickup/shield.java
        new file:   sprites/pickup/shieldPickup.java
        new file:   sprites/pickup/speedBoost.java
        new file:   sprites/player.java
        new file:   sprites/projectile.java
        new file:   sprites/wall.java


[user@lj src]$ git commit
[master (root-commit) 4cf5218]
 Initial commit
 Changes to be committed:
        new file:   engine/collisionChecker.java
        new file:   engine/direction.java
        new file:   engine/gameEngine.java
        new file:   engine/gameObjects.java
        new file:   engine/level.java
        new file:   engine/main.java
        new file:   engine/mathVector.java
        new file:   graphics/drawer.java
        new file:   sprites/baseSprite.java
        new file:   sprites/boss.java
        new file:   sprites/enemy.java
        new file:   sprites/healthBar.java
        new file:   sprites/menu/menuItem.java
        new file:   sprites/menu/menuItemExclusiveMoveOnInput.java
        new file:   sprites/menu/menuItemLevelDecrease.java
        new file:   sprites/menu/menuItemLevelIncrease.java
        new file:   sprites/menu/menuItemMovementDirections.java
        new file:   sprites/menu/menuItemProjectileLimit.java
        new file:   sprites/menu/menuItemStartGame.java
        new file:   sprites/pickup/fireRateBoost.java
        new file:   sprites/pickup/pickup.java
        new file:   sprites/pickup/shield.java
        new file:   sprites/pickup/shieldPickup.java
        new file:   sprites/pickup/speedBoost.java
        new file:   sprites/player.java
        new file:   sprites/projectile.java
        new file:   sprites/wall.java
 27 files changed, 2557 insertions(+)
 create mode 100755 engine/collisionChecker.java
 create mode 100755 engine/direction.java
 create mode 100755 engine/gameEngine.java
 create mode 100755 engine/gameObjects.java
 create mode 100755 engine/level.java
 create mode 100755 engine/main.java
 create mode 100755 engine/mathVector.java
 create mode 100755 graphics/drawer.java
 create mode 100755 sprites/baseSprite.java
 create mode 100755 sprites/boss.java
 create mode 100755 sprites/enemy.java
 create mode 100755 sprites/healthBar.java
 create mode 100755 sprites/menu/menuItem.java
 create mode 100755 sprites/menu/menuItemExclusiveMoveOnInput.java
 create mode 100755 sprites/menu/menuItemLevelDecrease.java
  create mode 100755 sprites/menu/menuItemLevelIncrease.java
 create mode 100755 sprites/menu/menuItemMovementDirections.java
 create mode 100755 sprites/menu/menuItemProjectileLimit.java
 create mode 100755 sprites/menu/menuItemStartGame.java
 create mode 100755 sprites/pickup/fireRateBoost.java
 create mode 100755 sprites/pickup/pickup.java
 create mode 100755 sprites/pickup/shield.java
 create mode 100755 sprites/pickup/shieldPickup.java
 create mode 100755 sprites/pickup/speedBoost.java
 create mode 100755 sprites/player.java
 create mode 100755 sprites/projectile.java
 create mode 100755 sprites/wall.java

Files are removed from the index in the same *NIX style:


[user@lj src]$ git rm -r .
rm 'engine/collisionChecker.java'
rm 'engine/direction.java'
rm 'engine/gameEngine.java'

... SNIP ...

To compare my local index with the repository, I use git diff (note: the row of hyphens at the end of most lines was trimmed for readability):


[user@lj src]$ git diff --cached --stat
 engine/collisionChecker.java                   | 281 ----- ...
 engine/direction.java                          |  14 ----
 engine/gameEngine.java                         | 504 ----- ...
 engine/gameObjects.java                        |  61 ----- ...
 engine/level.java                              | 134 ----- ...
 engine/main.java                               |  51 ----- ...
 engine/mathVector.java                         |  46 ----- ...
 graphics/drawer.java                           | 323 ----- ...
 sprites/baseSprite.java                        | 303 ----- ...
 sprites/boss.java                              |  73 ----- ...
 sprites/enemy.java                             | 119 ----- ...
 sprites/healthBar.java                         |  64 ----- ...
 sprites/menu/menuItem.java                     |  21 ----- ...
 sprites/menu/menuItemExclusiveMoveOnInput.java |  31 ----- ...
 sprites/menu/menuItemLevelDecrease.java        |  28 ----- ...
 sprites/menu/menuItemLevelIncrease.java        |  27 ----- ...
 sprites/menu/menuItemMovementDirections.java   |  30 ----- ...
 sprites/menu/menuItemProjectileLimit.java      |  31 ----- ...
 sprites/menu/menuItemStartGame.java            |  33 ----- ...
 sprites/pickup/fireRateBoost.java              |  39 ----- ...
 sprites/pickup/pickup.java                     |  77 ----- ...
 sprites/pickup/shield.java                     |  39 ----- ...
 sprites/pickup/shieldPickup.java               |  47 ----- ...
 sprites/pickup/speedBoost.java                 |  38 ----- ...
 sprites/player.java                            |  64 ----- ...
 sprites/projectile.java                        |  44 ----- ...
 sprites/wall.java                              |  35 ----- ...
 27 files changed, 2557 deletions(-)

When used without the cached option, only changes that have been made without being added to the index will be displayed. The stat option provides a quick table instead of the standard line-by-line review provided through the less command without it. This is often useful when looking for a summary of many files instead of analyzing small changes.

git status provides a more verbose output similar to diff:


[user@lj src]$ git status
On branch master
Changes to be committed:
  (use "git reset HEAD <file>..." to unstage)

        deleted:    engine/collisionChecker.java
        deleted:    engine/direction.java
        deleted:    engine/gameEngine.java

... SNIP ...

Branches are an essential part of git, and understanding them is paramount to grasping how git truly operates. Each branch is a different development path, which is to say that all branches are independent of one another. To explain this better, let's look at an example.

All projects start with the "master" branch. You can view the current branches with:


[user@lj src]$ git branch -a
* master

New branches are used to develop features that then can be merged back into the master branch. This way, different modules can remain separate until they are stable and ready to merge with the master branch, from which all other branches should derive. In this way, the master branch is more like a tree trunk than a branch. Creating a new branch often is referred to as "forking" the development tree, splitting the linear development into two before merging the branches again once development on the forked branch is complete.

To create a new branch, with all the data of the current branch, use:


[user@lj src]$ git checkout -b development
Switched to a new branch 'development'

checkout is used to finalize all operations on the current branch before detaching from it. The -b switch creates a new branch from the current branch. In this instance, I have created a development branch that will contain "hot" or unstable code.

Next, rename the master branch to "stable":


[user@lj src]$ git branch -m master stable

Now that you have your two branches set up, let's compare them to ensure that the development branch has been populated with the stable branch's data:


[user@lj src]$ git diff --stat development stable
[user@lj src]$

Since diff hasn't returned anything, you know they contain exactly the same data.

Now that you've got your two branches set up, let's begin making changes on the development branch:


[user@lj src]$ git diff --cached
diff --git a/engine/main.java b/engine/main.java
index 38577b5..5900d80 100755
--- a/engine/main.java
+++ b/engine/main.java
@@ -11,6 +11,8 @@ import graphics.drawer;

 public class main
 {
+       // WHEN CAN I GO BACK TO C!?!?!?
+
        /*
         * Class:                       main
         * Author:                      Patrick

And commit them to the branch:


[user@lj src]$ git commit
[development e1f13bd]  Changes to be committed: modified:
 ↪engine/main.java
 1 file changed, 2 insertions(+)

After committing the change, you're given a unique identifier—"e1f13bd" in this case. It's used to refer to this commit; however, it's pretty hard for feeble human minds to remember something like that, so let's tag it with something more memorable.

First, find and tag the initial commit:


[user@lj src]$ git log
commit e1f13bde0bbe3d64f563f1abb30d4393dd9bd8d9
Author: user <user@lj.linux>
Date:   Wed Jun 6 15:51:18 2018 +0100

     Changes to be committed:
            modified:   engine/main.java

commit 4cf52187829c935dac40ad4b65f02c9fb6dab7ba
Author: user <user@lj.linux>
Date:   Tue Jun 5 21:31:14 2018 +0100

     Initial commit
     Changes to be committed:
            new file:   engine/collisionChecker.java
            new file:   engine/direction.java
            new file:   engine/gameEngine.java
... SNIP ...


[user@lj src]$ git tag v0.1 4cf52187829c935dac40ad4b65f02c9fb
↪6dab7ba
[user@lj src]$ git tag v0.11 e1f13bd

Now that the two commits have been tagged with a version number, they're much easier to remember and compare:


[user@lj src]$ git diff --stat v0.1 v0.11
 engine/main.java | 2 ++
 1 file changed, 2 insertions(+)

After testing and ensuring that the development branch is stable, you should update the stable branch to the current development branch:


[user@lj src]$ git checkout stable
Switched to branch 'stable'
[user@lj src]$ git merge development
Updating 4cf5218..e1f13bd
Fast-forward
 engine/main.java | 2 ++
 1 file changed, 2 insertions(+)

As you can see below, both branches still exist and contain the same data:


[user@lj src]$ git branch -a
  development
* stable
[user@lj src]$ git diff --stat stable development

If at any time you want to roll back, use git revert to revert a commit and undo any changes it made:


[user@lj src]$ git revert v0.11
[stable 199169f] Revert " Changes to be committed:"
 1 file changed, 2 deletions(-)
[user@lj src]$ git diff --stat stable development
 engine/main.java | 2 ++
 1 file changed, 2 insertions(+)

This is all you need to know to get started and become proficient in using git for personal use. All git repos operate the same way; however, working with remote repositories owned by others brings its own caveats. Read on.

Working with Remote Repositories

First things first, let's get the remote repo:


[user2@lj ~]$ git clone src repo
Cloning into 'repo'...
done.

After some changes by user2, they are committed to user2's repo:


[user2@lj repo]$ git commit -a
[stable 6a04336]  Changes to be committed: modified:
 ↪graphics/drawer.java
 1 file changed, 1 insertion(+)

Now the original owner can pull the changes back into the main repo. Pulling fetches and merges the changes in one command where possible:


[user@lj src]$ git pull /home/user2/repo
remote: Counting objects: 4, done.
remote: Compressing objects: 100% (3/3), done.
remote: Total 4 (delta 1), reused 0 (delta 0)
Unpacking objects: 100% (4/4), done.
From /home/user2/repo
 * branch            HEAD       -> FETCH_HEAD
Updating 199169f..6a04336
Fast-forward
 graphics/drawer.java | 1 +
 1 file changed, 1 insertion(+)
[user@lj src]$ git diff --cached

All changes have been pulled into the main repo, and both parties have the most up-to-date version of the code. This works exactly the same on one system as it does on a hosted site, such as GitHub. The only difference is that the repo is located by URL rather than system path.

This is just the beginning of git! This quick start guide should be sufficient for any aspiring developer or frustrated coder sick of manually rolling back versions. Now you can call yourself a gitter, or git for short!


Thanks to: Linux Journal - The Original Magazine of the Linux Community Permanent link
Grep: Aprendiendo Shell Scripting usando el comando de terminal grep

13 de agosto de 2018

Simple Interactive Pie Chart with CSS Variables and Houdini Magic

Centro de aprendizaje blockchain: aprende gratis sobre la tecnología de moda con cursos, tutoriales y otras herramientas

8 de agosto de 2018


Aprender Blockchain

El blockchain o cadena de bloques es sin duda la tecnología de moda, principalmente por su uso en el campo de las criptomonedas como el Bitcoin y Ethereum. Pero no está limitado solo a eso, sino que puede ser la base de muchas otras plataformas descentralizadas.

Si eres desarrollador o quieres serlo, y buscas aprender todo lo necesario sobre la cadena de bloques, en Codementor han creado un "Centro de aprendizaje blockchain" con una amplia colección de recursos para estudiar programación en blockchain y estar al día de los últimos desarrollos en la tecnología.

Todo lo necesario para el desarrollo usando blockchain

Codementor es una comunidad para desarrolladores, y el centro de aprendizaje blockchain está orientado tanto a principiantes como a desarrolladores experimentados que busquen aprender sobre la cadena de bloques.

En el sitio te puedes encontrar varias listas seleccionadas por el equipo de Codementor, estas incluyen artículos con conceptos básicos, tutoriales, herramientas de desarrollo, cursos, podcasts y más.

Top Blockchain Videos Blockchain Learning Center 2018 08 08 10 21 40

Hay tutoriales de blockchain, Ethereum y Solidity. También consigues frameworks, librerías, clientes y otras herramientas (más de 40 en total) que puedes usar para escribir, verificar, probar y corregir código blockchain.

También tienen una sección dedicada a líderes en el campo, donde recomiendan seguir a algunas de las figuras más influyentes en el mundo del blockchain actualmente, como por ejemplo, Vitalik Buterin, el creador de Ethereum.

La cantidad de recursos es verdaderamente enorme, recomiendan hasta libros. Y todo es de libre acceso. La única dificultad que presenta es quizás el decidir por donde empezar con tanto contenido de donde elegir, y el sitio tampoco te ofrece una guía sobre esto.

En Genbeta | La última teoría de quién es Satoshi Nakamoto: Bram Cohen, el creador de BitTorrent

También te recomendamos

Opera lanza un navegador que integra su propia cartera de criptomonedas

Blockchain contra la censura en China: activistas del #MeToo usan Ethereum para escapar de los censores

Las matemáticas seguirán siendo la base del futuro, ¿estamos preparados?

-
La noticia Centro de aprendizaje blockchain: aprende gratis sobre la tecnología de moda con cursos, tutoriales y otras herramientas fue publicada originalmente en Genbeta por Gabriela González .


Thanks to: Genbeta Permanent link

Esta página chilena te permite hacer contratos legales completamente gratis

3 de agosto de 2018


¿Alguna vez te viste envuelto en la situación de tener que desarrollar contratos? No es juego de niños la cosa, y buscar asesoría no es precisamente barato.

Es por eso que nos llamó la atención esta página chilena que ofrece una serie de contratos inteligentes de forma completamente gratuita.

Dentro de su catálogo, insistimos, todo gratis, hay de trabajo, de arrendamiento y pronto de honorarios, todos con formatos subyacentes específicos de acuerdo a la necesidad de lo que busques.

Además dice que próximamente tendrán calculadora de boletas de honorarios y de remuneraciones, todo junto a guías de contratos por si necesitas la información y mucho más.

Pareciera ser muy bueno para ser cierto, pero podemos apreciar que es un proyecto auspiciado por Corfo. Ahí nos hace más sentido.

Sin duda una herramienta bastante útil para tener en cuenta cuando la necesidad llame.


Thanks to: FayerWayer Permanent link

Maizzle Email Framework

abc to SVG

31 de julio de 2018

Laravel vs Symfony – Choosing the Best PHP Framework


laravel vs symony

PHP has been and still is one of the most popular programming languages. Thus, there’s a number of PHP frameworks that are great to use when efficiency, speed, and reliability are what’s needed in the development and the project output. Below are just some of the advantage of using PHP frameworks in web development projects: […]

The post Laravel vs Symfony – Choosing the Best PHP Framework appeared first on Dunebook.com.


Thanks to: Dunebook.com Permanent link

Lazy Loading Images with placeholders

26 de julio de 2018


BTC: 12JxYMYi6Vt3mx3hcmP3B2oyFiCSF3FhYT

ETH: 0xCD715b2E3549c54A40e6ecAaFeB82138148a6c76


Thanks to: Latest snippets on Bootsnip Permanent link

BuddyCSS: A new CSS framework for people who love making websites


What is BuddyCSS?

BuddyCSS is a relatively new CSS framework, created by French developer Loic Sciampagna.

The idea behind BuddyCSS is to keep the coding fun. Therefore, the framework is mostly made for front-end developers who enjoy to write their own code and see a CSS framework as a starting point instead than a complete solution. The name Buddy comes from the fact that its creator sees the framework as a work buddy, helping you with tasks, but letting you work your own way.

As a result, BuddyCSS is pretty lightweight, which is very good news now that website speed optimization is so important in order to guarantee a good usability for your visitors as well as to keep your SEO rankings high.

Pros and cons

Now that I’ve introduced you to BuddyCSS, let’s have a closer look at its main features, pros, and cons.

For starters, BuddyCSS looks great. The look and feel is what users generally notice first when using a website, so it’s great news that BuddyCSS looks amazing out of the box. The framework uses Google fonts and FontAwesome 5 (free), for a beautiful end-result.

Secondly – BuddyCSS is well written, easy to use and well documented. If you have some HTML/CSS experience, no way you’re gonna get lost. Featuring the most used website components (navigations, flex grids, fullscreen, paginations, form elements, etc) BuddyCSS will help you make websites that look great, quickly and efficiently.

BuddyCSS is not dependant on jQuery. While I really like jQuery, I love the idea of not being forced to use it in just like any projects, as you sometimes just don’t need it.

And at last but not least, BuddyCSS is free and updated frequently, so there are many things to expect in the near future.

Usage

So now that we have seen what we can do with Buddy, how about using it and get a new project started?

There are two main ways to use BuddyCSS in your project. The first way is the “ready to use” mode, which simply consists of importing the BuddyCSS files into your project. Buddy’s website features a HTML starter, which I’ve reproduced below:

<!doctype html>
<html lang="en">
  <head>
    <title>BuddyCSS</title>

    <meta charset="utf-8">
    <meta http-equiv="X-UA-Compatible" content="IE=edge">
    <meta name="viewport" content="width=device-width, initial-scale=1, shrink-to-fit=no">

    <!-- Go to  http://realfavicongenerator.net/ to get your own favicon readable on all platforms -->

    <meta name="author" content="Loïc Sciampagna">
    <meta name="description" content="CSS responsive framework to build awesome websites easily.">

    <meta property="og:url"                content="https://www.buddycss.com" />
    <meta property="og:type"               content="Website" />
    <meta property="og:title"              content="BuddyCSS" />
    <meta property="og:description"        content="CSS responsive framework to build awesome websites easily." />
    <meta property="og:image"              content="https://www.buddycss.com/images/sharer-1.jpg" />

    <link href='//fonts.googleapis.com/css?family=Roboto:400,300,600,700,800,900,300italic,600italic' rel='stylesheet' type='text/css'>

    <!-- All CSS files which are not included in NPM -->
    <link rel="stylesheet" type="text/css" href="css/buddy.plugins.min.css">

    <!-- Header, see component menu to know how it works -->
    <link rel="stylesheet" type="text/css" href="css/buddy.header.min.css">

    <!-- All SCSS files compiled into one CSS file -->
    <link rel="stylesheet" type="text/css" href="css/buddy.min.css">

    <script type="text/javascript" src="js/buddy.min.js"></script>
  </head>
  <body>
  </body>
</html>

If you have little experience with front-end development, you should already know what to do: Download Buddy, put it on your server and start editing the HTML starter provided. Simple as that, your project is ready and now only needs your creativity.

The second mode is for more advanced users and is provided with Gulp, SASS, and Babel. Installing the full-mode version isn’t complicated, all you have to do is to follow the following steps:

  • You can go to the github repository page or just copy/paste the URL below:
    git clone https://github.com/BuddyCSS/BuddyCSS.git
    
  • Once BuddyCSS is on your computer, use Yarn or npm i to install it.
  • Now use the command line gulp to build your project and open automatically a new tab with a ready website.
  • Don’t forget to check the files structure.

That’s it. Now you can explore the documentation to see how BuddyCSS components work and how to use them in your own projects.

Conclusion

So what to think about Buddy? Well, I must admit that I had a very good time playing with it for this review. The ease of use, flexibility and its gorgeous look are, in my opinion, its biggest strong points. If you enjoy making websites, give it a try – You won’t regret it.


Thanks to: CatsWhoCode.com Permanent link

Laravel Query Builder

17 de julio de 2018

Learning To Code By Writing Code Poems

11 de julio de 2018


Buscar este blog

Favorite drug

Top views